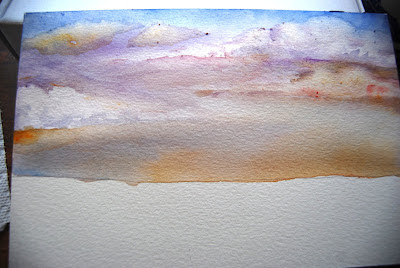
Today I'm going to show you how to paint a sky. Now the real point of the exercise is to loosen up, not to produce a photographic image. Too many people become tense when holding a brush and as a result (especially in watercolor painting) they are perpetually frustrated. With this painting we are going to embrace that water may travel to odd places, pool, or strange colors may mix together.
Supplies:
- Watercolor paper: I am using cold press paper which is in a block. If you do not have a block (the papers are glued together so that the paper will not buckle) tape your paper to a piece of board with artist tape (which will not tear the paper when removed). If this is your first time pick a smaller piece of paper so that you will not feel pressed for time as the water begins to dry.
- Something to lean your paper on so that it is at an angle.
-Watercolor paints
-Watercolor brushes of various sizes: I am using a 10, 8, and 2
-Clean Water
-Paper towel
-Pencil
1. Angle Your Paper
 I am resting my block on a small box. This step is essential, the angled page will let the colors move where they will and cut down on our work in moving them about and blending them together.
2. Everything in Its Place.
3. Find Your Horizon Line.
The horizon line is simply the line that separates the ground from the sky. You can draw this anywhere creating different effects, some more dramatic than others.
5. Wet the Area of the Sky.
We are just going to use water to paint over the entire area of our sky. No pigment is needed yet. This technique is called wet on wet.
6. Add Color!
Wet your brush again and pick a color. I picked a nice dark blue to start. Notice how the color moves and changes intensity.
I start to get dramatic, picking more daring colors like purple, red, orange and yellow. Don't be afraid to play! Remember always move your brush in horizontal movements rather than vertical.
7. Adding Clouds.
To add clouds to our painting we are going to first dry our brush.
And then move the paint away from where we want our cloud to be. I make small back and forth motions with my brush to move the paint away. Be firm with your brush but be careful not to ruin your bristles.
Do you see the clouds starting to form? Also notice the little dots (they sort of look like I erased something) this is the paper starting to give way a bit. I'm not too phased by this, I just make sure to keep checking on the paper so that it does not develop a hole.
I'm taking my smaller brush out to further move the paint away from my clouds so that they stand out more.
If you like take a small piece of paper towel and gently sweep away the paint from the tops of your clouds, leave a bit of pigment on the bottom. Remember that clouds are three dimensional and have their own shadows.
Looking good, but I want my clouds to be more striking. So I'm going to let the paper dry a little bit, not all the way. And then add some darker colors around my clouds so they pop.
I just placed this deep red, notice how it looks too sharp the edges are hard and not very cloud like. All we have to do is take our moist brush (do not wet it too much) and soften the lines by going over them gently.
Adding shadows on the cloud forms themselves.
Now that the paper is getting a little more dry we can use a more aggressive technique for the clouds. I placed down bit of orange on the page (for the top left cloud) then saturated my brush and started to move the pigment away (like we did before), but letting the orange into the cloud form.
Make sure to pay attention to the area behind the clouds as well, making it a bit darker so that it works to highlight the clouds.
Take out your smallest brush and move more pigment away from the tops of the clouds one more time.
Afterwards step back from your painting and look to see if there are any hard lines. I see one on mine (lower left right under that cloud). Be sure to soften them using the method that we described above.
8. Your sky is DONE!
Now step away for a little bit and let everything dry. Part 2 of this tutorial will be filling in the ground.


Thank you so much for the tutorial
ReplyDelete